Ok, so this blog is being written because even though this year I made my third gingerbread house (not this year… overall), every year it feels like I am starting again from the very beginning. This year before I started baking I spent all morning looking through the internet and my cookbooks trying to remember which recipes I had tried and liked and despite my efforts, I just couldn’t remember… so now that it is done, I have decided that this year, instead of just posting a picture of the gingerbread house I am posting everything, the recipe, the template and the things that worked and the things that didn’t, so that next year I might save myself some time, stress and probably money.
Each year I like to make something slightly different from those I have tried before… except in 2014… where it appears I didn’t make one. Anyway, so far my gingerbread creations have been a basic house, a few little houses and a village:
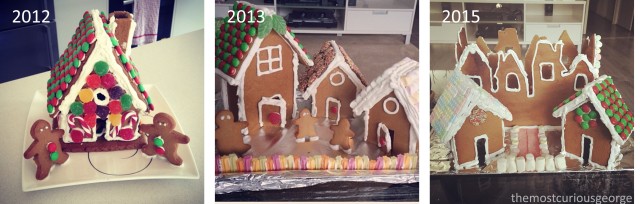
This year I made a mixture… I returned to some of the houses from 2013 and added in a few new elements… a Christmas tree and a sleigh. After all the searching beforehand I ended up returning to my trusty Donna Hay back catalogue where I pulled out the recipes for basic gingerbread cookie dough… which I used for my sleigh and tree and the recipe for the houses as well as the template from Donna’s website.
The Houses:
Ok, so lets start with the houses… because lets face it… they are the most important… Donna Hay’s Recipe comes from Issue 72 (Dec/Jan 2014 page 139) and the recipe is as follows:
Ingredients:
Gingerbread:
1.2kg plain (all-purpose) flour
2 tsps bicarb soda
1 1/2 cups (265g) brown sugar
1 tbsp ground ginger
380g unsalted butter, melted
1 2/3 cups (580g) golden syrup
icing sugar to decorate
Icing
4 cups (640g) icing sugar
3 eggwhites
1/4 tsp cream of tarter
1 tbsp lemon juice
Method:
 1. Preheat oven to 180°C. Place half the flour, bicarb, brown sugar and ginger in a large food processor and pulse until combined. Add half the butter and golden syrup and process until the dough comes together. Transfer to a large bowl.
2. Repeat with the remaining dry and wet ingredients. Add the two batches of dough together and knead until smooth and combined.
3. Divide the dough into 4 equal pieces. Using your fingers, press each piece into a 37cm x 25cm Swiss roll tin. Smooth the top with the back of a metal spoon.
4. Bake in 2 batches for 12-15minutes or until golden.
5. Transfer gingerbread sheet onto a large chopping board and start cutting out the shapes while it is still hot using a metal ruler and a sharp knife. Don’t forget to print out the template found here.
Donna Hay suggests the following order:
Sheet 2 & 4:
• Large house walls
• Front of small house
• Back of small house
• Small house roof
• Small house walls
• Chimney
Sheet 1 & 3:
• Large house roof
• Front of large house
• Back of large house
6. To make the icing; place the sugar, egg-whites and cream of tartar in an electric mixer and beat for 4-5 minutes or until light and fluffy.
7. Add the lemon juice and beat for a further 2 minutes or until well combined.
8. Use a piping bag to use decorate the house with the icing and glue the houses together. I used the icing recipe as my glue and for my own free style decoration rather than the prefect and very beautiful lattice design intend… as my decorating skills just aren’t that good.
Notes:
Initially I was worried that the pieces for each house were quite hard and tended to snap rather than break of nicely when cooled. However, once assembled and no longer trapped in an air tight container, the gingerbread softened enough to break and eat, but not enough to collapse… which turned out perfectly, despite my initial concerns of broken teeth.
I only have a small oven, so I needed to cook the sheets of gingerbread all separately, and because I took a little longer preparing my dough, my oven was well and truly at temperature before starting. I had to keep a close eye on the sheets and the more I cooked, the less time they required as my oven is also not as good at keeping temperature without going over as I would like. So make sure you keep watch as you need all of the sheets to get all of the parts so some burnt sections can make it tricky to fit all of the template in… plus they taste and look pretty average.
The glue is also very good, it sets quickly and holds well, but once set is still able to be broken with ease for consumption while remaining strong enough to hold the untouched parts still in place.
The Sleigh and the Tree:
Okay… so once the house was done I started on the sleigh and tree. For both of these is used Donna Hay‘s ‘basic gingerbread cookie dough’ recipe which can be found online here, or if you are bit lazy like me… I have done the non-lazy thing and typed it out, just in case I lose my copy of Issue 78 (Dec/Jan 2015 page 156) or the website changes. Anyway the recipe is as follows:
Ingredients:
• 125g unsalted butter, chopped and softened
• ½ cup (90g) brown sugar
• ⅔ cup (230g) golden syrup
• 2½ cups (375g) plain (all-purpose) flour, sifted
• 1 teaspoon bicarbonate of (baking) soda, sifted
• 2 teaspoons ground ginger
• 1 teaspoon mixed spice
Method (Emma’s modified version):
 1. Preheat the oven to 180°C.
2.Place the butter and sugar in the bowl of an electric mixer and beat for 6−8 minutes, scraping down the sides of the bowl, until pale and creamy.
3. Add the golden syrup, flour, bicarbonate of soda, ginger and mixed spice and beat until a smooth dough forms.
4. Roll the dough out between 2 sheets of non-stick baking paper to 5mm thick and then use the sleigh template (see below) and star cookie cutters (see tree assembly below) to make the pieces required. If there is some left over use a gingerbread man cookie cutter to cut out men from the dough, re-rolling the dough as necessary.
5. Bake on trays lined with non-stick baking paper for ~8mins or until golden (Donna’s recipe was for a gingerbread man wreath, so this is where the instructions get a little messy, but I left my oven hot from the gingerbread house and cooked for shorter time, but they turned out perfect, you just have to watch them).
6. Allow to cool for a few minutes before transferring to wire rack to cool completely.
Sleigh Assembly:
The sleigh template I used can be found here, it is one that I found thanks to Pinterest and I used the template to cut out the shapes before baking them. I used the left over house ‘glue’ (icing) to put the sleigh together, using large candy canes as the sleigh’s runners as suggested by the blog. The sleigh requires some holding while the glue sets as my pieces warped a little in the over, and the candy canes will only support the whole thing once it is just that… one piece.
Tree Assembly:
For this one I googled a couple of things to get the idea but didn’t follow anyone’s instructions so to speak. I made the tree using different sized star cookie cutters. I got a set of 5 sizes from my trusty k-mart and made ~4 of each size, so that I would have at least 3 good ones for my tree (I also made some extra ones for eating with the left over dough). Once the cookies were cooked, I used glue which I used green food dye to turn green to layer the stars on top of each other in height order. At the very top of the tree I used a small star cookie standing up to make a tree topper (with Davo’s encouragement I dyed some icing yellow just for a better star effect). This actually worked out much better than I thought it would, and was the most popular component on movie marathon day.
Once all the bits were together and decorated, this is how it turned out…
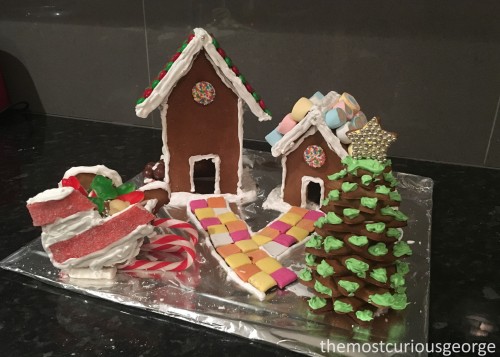
Pretty good if you ask me! Well at least not bad for an amateur. Hopefully I will remember that I wrote this blog and save myself some time next year… Oh and this also crossed no. 21 ‘Make some kind of festive seasonal dish’ off the list.
Ok so there you have it… I am going to go and eat some of the left overs.


 very different from the end of term four last year. There have been no phone calls in tears wanting him to come home, Isaac has been feed and changed and I have pumped, showered and eaten successfully all three days which feels like a win to me. Of course it also helps that he is a little more interactive this time, and I had 6 weeks over summer with an extra pair of hands to help me get used to it and build up some confidence. But I am not as terrified about this coming week as I was this time last week.


 96.
96. 


 14.
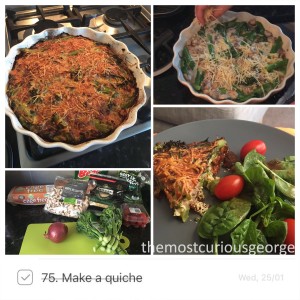
14. 


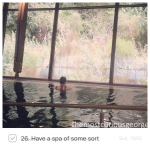 26.
26. 
 44.
44.  18.
18. 

 23.
23.  10.
10.  11.
11.  97.
97.  45.
45.  85.
85. 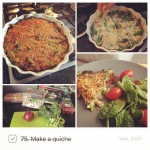 75.
75.